A signature block or email signature is a block of text appended to the end of an e-mail message often containing the sender’s name, address, phone number, disclaimer, or other contact information.
Gmail and Yahoo Mail are among the most used free email services worldwide. Backing up with the two giant companies on the internet Google and Yahoo, selecting their free email services is a no-brainer.
Adding an email signature on Gmail and Yahoo Mail is simple, by following the steps given in this article you can easily add it with no hassle.
How to Add an Email Signature in Gmail
Step 1: Log in to Your Gmail Account
- Open your web browser and go to Gmail.
- Enter your login credentials (email and password).
Step 2: Open Gmail Settings
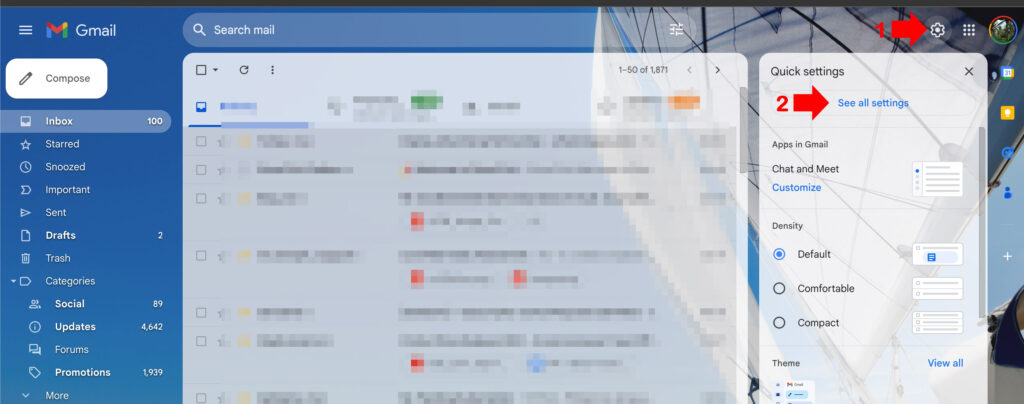
- Once logged in, click on the gear icon located at the top-right corner of the Gmail page.
- From the dropdown, select “See all settings” to open the full settings menu.

Step 3: Go to the Signature Settings
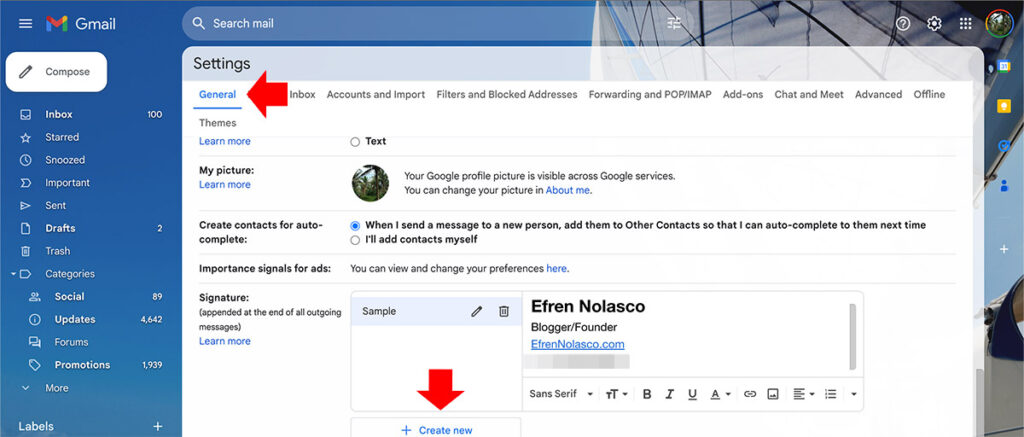
- In the settings menu, go to the “General” tab (this should be the default tab).
- Scroll down until you find the “Signature” section.

Step 4: Create Your Signature
- Click on “Create new” to add a new signature.
- A box will pop up asking you to name your signature. Enter a name for it (e.g., “Work Signature”).
- In the signature box, type the information you want to include in your email signature. This can be:
- Your full name.
- Job title and company name.
- Contact details (phone number, email).
- Website or social media links.
- You can format your signature using the text editor tools (e.g., change font, size, color, or add images like a company logo).
Step 5: Set Signature Defaults
- Just below the signature box, you’ll see Signature Defaults:
- Choose which signature to use for new emails and for replies/forwards by selecting from the dropdown menu.
- If you don’t want to automatically add your signature to replies or forwarded emails, leave that option as “No signature”.
Step 6: Save Changes
- After you’re satisfied with your signature, scroll to the bottom of the page and click “Save Changes”.
- Your signature will now automatically appear in your future emails, depending on the settings you chose.
How to Add an Email Signature in Yahoo Mail
Step 1: Log in to Your Yahoo Mail Account
- Open your web browser and go to Yahoo Mail.
- Enter your Yahoo Mail credentials (email and password).
Step 2: Open Yahoo Mail Settings
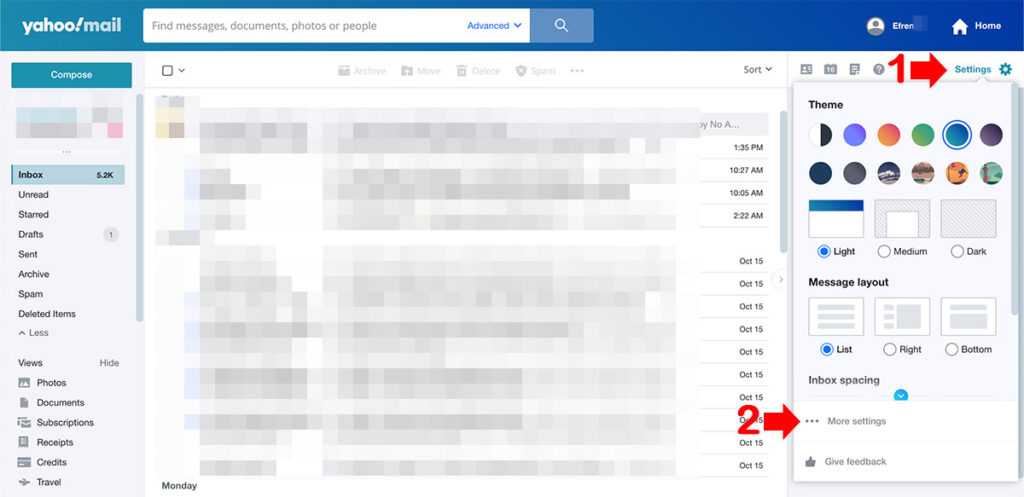
- In your inbox, click on the Settings (gear icon) located at the top-right corner.
- From the dropdown menu, select “More Settings” to open the full settings menu.

Step 3: Go to the Signature Settings
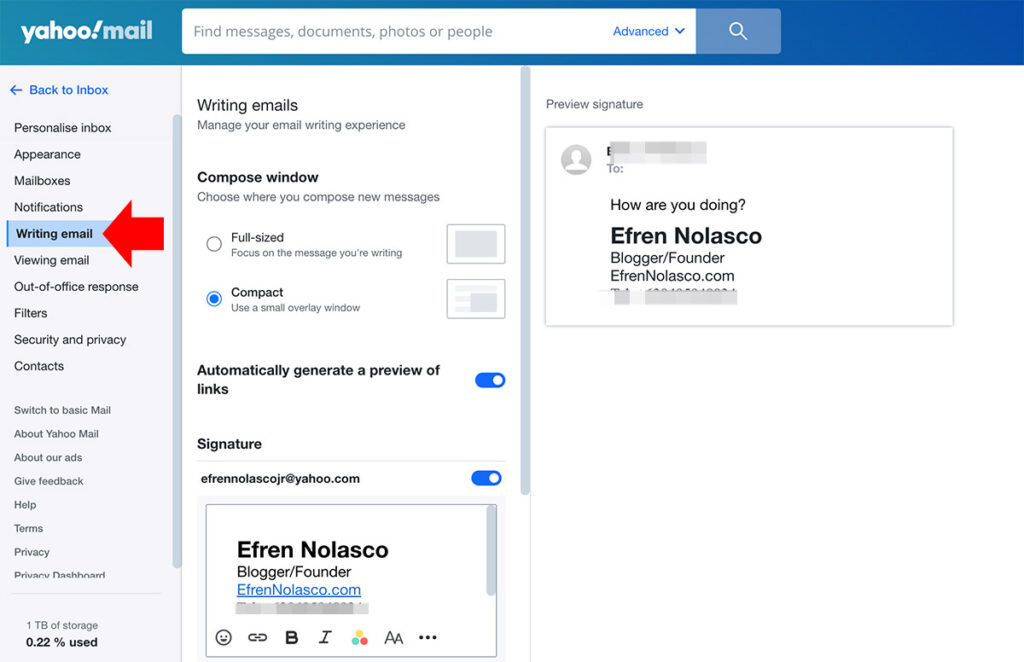
- In the left-side menu, click on “Writing email”.
- Scroll down to the “Signature” section on the right-hand side.

Step 4: Create Your Signature
- If you have multiple email addresses connected to your Yahoo account, select the account you want to add the signature to.
- Toggle the “Signature” switch to turn on the signature feature.
- In the text box, type your desired signature information, such as:
- Full name.
- Job title and company name.
- Contact details (phone number, email).
- Website or social media links.
- You can format the text (e.g., bold, italic, change font size, or add links).
Step 5: Save Your Signature
- Once you’re done composing your signature, there’s no need to manually save it—Yahoo Mail saves changes automatically.
- Your signature will now appear automatically at the bottom of all new emails you send.
Tips for Crafting a Professional Email Signature
- Keep it concise: Limit your signature to essential information (name, title, and contact details).
- Use proper formatting: Choose a simple font that is easy to read, and avoid overly large text or too many colors.
- Add links: Include hyperlinks to your website, social media, or LinkedIn profile for added professionalism.
- Use a logo (optional): If you have a business, consider adding your company’s logo to enhance brand recognition.
By following these steps, you can set up a personalized and professional email signature in both Gmail and Yahoo Mail!
READ ALSO:
- How to know if the email message you sent successfully read by your recipient using Microsoft Outlook
- How to recall or change the message that already sent in Microsoft Outlook