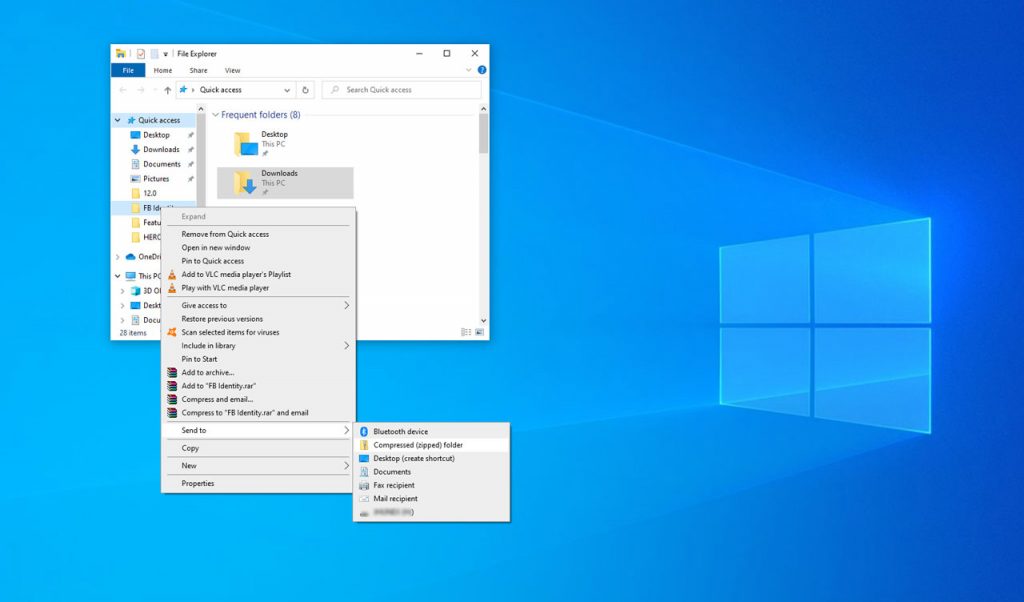
To limit how much space is occupying your storage, one may opt to zip or unzip files as large files not only take up a lot of space but are also difficult to share and send to others. Zipping files on Windows 10 reduces the size of files by compressing them, saving disk space, and reducing network transfer times.
Creating a Zip File on Windows 10
In order to do this, let’s first take a look at how to create a zip file:
Read: How to Password Protect Windows Files
First off, open File Explorer then choose the files or folders you wish to compress. Take note that Zip file or a “compressed folder” are interchangeable terms in this case as Windows refers to a Zip file as a “compressed folder.”

If it is an individual file or folder you would like to compress, right click the file/folder and a menu will appear. Select “Send to” and then choose “Compressed (Zipped) Folder.”
However if you wish to compress multiple files or folders, you may do so by selecting all the files you want to compress and follow the same steps as before to compress them all at the same time. A new Zip file will show up in the same place where you compress files. The Zip icon features the standard Windows folder with a zipper on it. Windows then lets you name your Zip file as you desire to name it so. Type a name and then press Enter.
Read: How to Make a Supper Hidden Windows Folder Using Command Prompt
That’s the basic step to this article in which we zip and unzip files on Windows 10.
Viewing and Adding to a Zip File’s Content
Such the case that you desire to view your Zip file’s contents, double click on the Zip file in the Explorer. From here, you will be able to see the files it consists since Zip files open similarly like a regular folder.
If you also wish, you may copy and paste or drag and drop files into the content of your Zip file folder. You may also remove certain files by deleting them from the Zip file folder itself. Once you are satisfied with the changes, close the Zip file folder, and you are good to go. You may also copy and paste the Zip file to whichever place you desire to do so.
Read: JuanTax—New App to Help Fill Out Tax Forms
Extracting All Files from a Compressed Folder
If you wish to extract files from a compressed folder (Zip file) that contains multiple files, the easiest way would be to extract them all at the same time into a new folder. To do this, find and choose the Zip file you wish to unzip or extract in Explorer.
Right click the file, and then choose “Extract All” from the drop-down menu. A dialog box will appear to ask the location in which you would wish to put the files you are extracting. To switch the location of the file, select “Browse” and choose a path. Once you are finished, click “Extract.”
Read: How to Transfer Large Files Using the SHAREit App
The files will then be extracted/unzipped to the directory you chose, and you will see them in a new window.
Extracting a Single File from a Compressed Folder (Zip File)
On Explorer, find and choose the compressed folder or Zip file from where you wish to extract a certain individual file. Once you double click on the compressed folder, the Zip file would open like a standard folder and from there, you will see either a list of files or group of icons representing the compressed files.
Choose the file you desire to unzip and then drag it out of the zip file folder window to another location (it may be anywhere from another folder or on your desktop). The extracted file will then be copied to the new location and will also stay in the Zip file from where it has been originally. Once you are finished, simply close the Zip file folder window.
Read: How to Compress and Decompress Files
Other ways to Zip and Unzip Files
Third party tools may also be used to zip and unzip files on Windows 10 such as 7-zip. You may also use a password to protect and encrypt your Zip files while compressing them for security.
Unzip Files for Free Online
You may try and use online tools for free to unzip files by simply searching for “unzip files free online,” and a list of free online unzipping tools will appear on your screen. Many of these free online tools or rar extractors will guarantee you to extract multiple types of compressed files like rar, zipx, tar, 7z, wim, exe, dmg, and more.
Read: Here’s How You Can Free Up Space on Android
Top unzip free online tools include Archive Extractor, Archive Converter, 7-Zip, Unzip-online, B1 Online Archiver, ezyZip, Files2Zip.com, WOBZIP, etc.
The file you desire to unzip may come from your computer, Google Drive, Dropbox, etc. and drag & drop files to the designated place of the free online unzip services. It will do the process of unzipping the files for you. After the file unzip process is done, you may download the uncompressed files to your computer.
These are the ways to zip and unzip files on Windows 10. So easy, right? Were the instructions above helpful? Let us know!
I use winRAR most of the time, it may not reduce the size but the thing is, i can manage the group of files easily. Like uploading .exe files or uploading bunch of photos in one click.
A great article indeed, thanks.