The computer, as we know it consists of the following main parts: A Central Processing Unit (CPU), a keyboard, a mouse, and a monitor. Over the years, we have taken advantage of it and used it to overcome difficult tasks. And although we’re contented with just one monitor, imagine working with two (2). Yes, your productivity, speed, and overall work will improve. There are a lot of questions that revolve around having dual monitors and today, we’ll give you the basic instructions on how you can install it.
Setting up a dual monitor in Windows 7
First and foremost, you need to have an idea of the different video cables used in and for a computer c/o of Dell:
DisplayPort
This new-age connection is used mainly for connecting monitors to computers. It is a USB port but one side has an angle. This type of cable should be used if your laptop or desktop is DisplayPort ready.
VGA
The Video Graphics Array (VGA) however, is the analog standard for connecting monitors to computers. VGA connections usually are color-coded with blue plastic and labels. A VGA cable should be used if DVI ports are not available on your laptop or the external monitor.
DVI
This leads us to the Digital Video Interface (DVI). This is the digital standard for connecting monitors to computers. DVI connections are usually color-coded with white plastic and labels. A DVI cable should be used if DVI connectors are available on your laptop and the external monitor.
HDMI
Lastly, the High-Definition Multimedia Interface (HDMI) is the current digital standard for connecting many kinds of video devices and provides the same quality video signal as DVI. In addition, the HDMI can provide audio through the cable, but the video card installed in your computer must be capable of supporting the audio through HDMI in order for it to work properly. An HDMI cable should be used if HDMI ports are available on your computer and the external monitor.
Now, the process of setting up the dual monitor for Windows 7.
To tell you the truth, setting up a dual monitor in Windows 7 is easy as 1, 2, 3. There actually are two (2) methods on how you can go about this.
Win + P
This method is probably the simpler of the two since you won’t have to do nitty-gritty arrangements and preparations just to set-up a dual monitor.
1. Make sure that your Desktop or laptop has an open port other than your main monitor. **If your device doesn’t have an open port, install AGP or PCI video card to support the changes.
2. If neither monitor comes with a DVI port, utilize a DVI-to-VGA adapter.
3. Plug the second monitor to the open port and turn the monitor on.
4. After connecting your extension, restart your computer.
5. Press Win + P on your keyboard. This will prompt an array of monitor settings/options as seen below. 
6. Selecting Extend will automatically arrange the adjustments for you. If this does not suit you, you can go and make the adjustments yourself in the “Screen Resolution” menu.
The Screen Resolution Menu
If you are not comfortable with the above process, you can go and execute this by going old-school.
1. Make sure that your Desktop or laptop has an open port other than your main monitor. **If your device doesn’t have an open port, install AGP or PCI video card to support the changes.
2. If neither monitor comes with a DVI port, utilize a DVI-to-VGA adapter.
3. Plug the second monitor to the open port and turn the monitor on.
4. After connecting your extension, restart your computer.
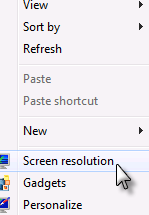
5. Right-click at any empty area of your desktop and click Screen Resolution.

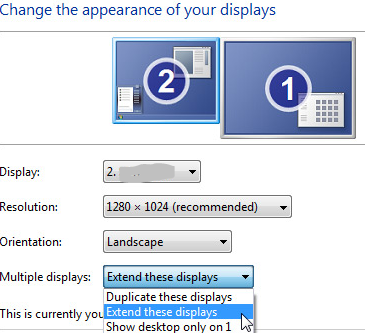
6. From this menu, click the dropdown menu that has Multiple Displays. In this dropdown, select Duplicate these displays OR Extend these displays. The Duplicate these displays option allows you to duplicate what you see in monitor 1 to monitor 2. While the Extend these displays option extends the reaches of your monitor and allows different applications to be displayed on either monitors.

7. After doing so, configure the adjustments that would suit you. Click Identify Monitors to see which is Monitor 1 and Monitor 2. You can have this rearranged by dragging the monitor icons to match to your liking.
**NOTE: If you do not see the additional monitor/s listed, click Detect. If it still doesn’t appear after analyzing, shut your computer down and reconnect the cables. Try it once again with either of the methods.
Setting up a dual monitor in Windows 10
In setting up dual monitors for Windows 10, it’s not as different as how you set it up for Windows 7. The only difference it will make is in the second method which is the Screen Resolution method. In W10, the process would be:
1. Complete steps 1-4.
2. Right-click on any empty area on your screen and click Display Settings.
3. Click the Multiple Displays dropdown menu and select your desired option. You can select either Duplicate these displays or Extend these displays. The Duplicate these displays option allows you to duplicate what you see in monitor 1 to monitor 2. While the Extend these displays option extends the reaches of your monitor and allows different applications to be displayed on either monitors.
**NOTE: If you do not see the additional monitor/s listed, click Detect. If it still doesn’t appear after analyzing, shut your computer down and reconnect the cables. Try it once again with either of the methods.
Setting up a dual monitor in MAC
For hooking up a second monitor for MAC, things are quite different. You would be needing a special cable which is called a DisplayPort-to-DVI cable.
1. Connect the thunderbolt to your MAC device and plug the other end to the back of the second monitor.
2. Turn on the monitor; restart your MAC.
3. On your MAC, select System Preferences > Displays.
4. Select Arrangement from the main categories of Display and choose your preferred arrangement/display of the two monitors.
**NOTE: The dual monitor function is applicable to MAC devices that have HDMI/DisplayPort (Thunderbolt) capabilities.
That’s just about it in setting up your dual monitors for Windows 7, Windows 10, and MAC. With two (2) monitors, working would definitely be easy and your productivity will be at its best.